This article explains how to set up a fast and efficient Nextcloud as file management tool with OpenID Connect to Authelia.
It is part of my series on creating a home server on an old laptop. I’m assuming that you’ve set up Docker, Caddy, and Authelia, as described in the first article of the series.
Why Nextcloud? #
My previous home server was a Synology NAS, that came with a file management/syncing solution, which worked pretty well. It has all the nice features like selective sync, sharing, requesting files, and it was fast and fun to work with. Before I moved to a custom home server, I did some research on possible solutions with similar features and came up with ownCloud and Nextcloud.
ownCloud vs. Nextcloud #
ownCloud and Nextcloud used to be one solution but then went in different directions. In the first article of the series, I’ve written that my home server is based on Helge Klein’s series on home automation and if you are following his series, you know that he decided to go with ownCloud Infinite Scale (oCIS) instead of Nextcloud. I tested ownCloud, but was not convinced.
Blob Storage #
ownCloud kidnaps your files and stores them in blob storage format. You can’t access your files in the classic way by browsing the file system. I understand the technical background, but I don’t like the fact that I can’t access my data directly, but always have to go through an ownCloud client.
External Storage #
oCIS can’t integrate other storage types like WebDAV, not even a folder on your local disks.
Community #
oCIS is relatively new compared to Nextcloud and there doesn’t seem to be a huge community. I had some issues while testing ownCloud and if you search for something on Google but get exactly 0 results, that makes me wonder.
Nextcloud on the other hand has a large community and you can be sure that every question you have is already answered somewhere on the Internet.
Streamlining Nextcloud #
I only need Nextcloud to synchronise files. But the makers seem to think it’s a good idea to pack everything that can be programmed into Nextcloud. It’s not for nothing that Nextcloud has a reputation for eating up plenty of resources.
To top it all off, there is a dedicated Nextcloud All-In-One project including antivirus, backup, and image updates, to name just a few. Ridiculously, it’s the recommended method to deploy Nextcloud.
My Nextcloud build, instead, is focused on the core functionality, file syncing, as well as performance. When you need additional features, you can simply turn them on.
Nextcloud Installation in Docker Container #
Preparation #
We have to prepare a few things before we can create the stack.
Limited User And Group #
Docker is running as root and so are the containers. If the image supports it, you can specify another user and the container will access the file system with that user.
Nextcloud is one of the services I want to be accessible externally (future article) hence running it with root permissions is a no-go.
Static User ID #
Users and groups get IDs on Ubuntu. System users get an ID below 1000. Your user most likely has the ID 1000 as you were the first user on the machine. When you create a user, Ubuntu assignes the next available ID. For our limited user we want something static and something that’s not already taken on the current machine and on any other machine you might deploy in the future. We want that because the restic backup includes permissions based on IDs. So when you restore your backup on a new machine, the ID of the user in the backup and the one on the new machine must match to be able to access files.
2000 is easy to remember and on a home server with few users most likely free. If you want to be sure, you can check the allocated IDs first.
sudo cut -d: -f1,3 /etc/passwd
Files And Folders #
In your WSL client, create a new Ansible role for Nextcloud.
mkdir -p roles/nextcloud/tasks
vim roles/nextcloud/tasks/main.yml
# main.yml

# Ansible role for Nextcloud
- name: Create user dockerlimited with UID 2000
  user:
    name: dockerlimited                           # change to your preferred username
    uid: 2000                                     # change to your preferred UID

- name: Create directories for Nextcloud
  file:
    path: "/usr/local/data/docker/{{ item }}"     # change to your preferred directory
    state: directory
    owner: dockerlimited
    group: dockerlimited
    mode: 0755                                    # owner has full read, write, and execute permissions, while the group and others have read and execute permissions, but no write permissions
  loop:
    - nextcloud/secrets                           # files containing secrets for Nextcloud
    - nextcloud/config                            # config for Nextcloud
    - nextcloud/data                              # your files for Nextcloud

- name: Create compose.yaml file
  file:
    path: "/usr/local/data/docker/nextcloud/compose.yaml"
    state: touch
    owner: dockerlimited
    group: dockerlimited
    mode: 0644                                    # Owner has read and write permissions, while the group and others have read permissions


# generate a random 32 character alphanumeric string for the Nextcloud database password and the Nextcloud database root password.
# 32 is the max for MyQSL. Reduce the length if you run in to issues.
- name: Generate MySQL password for Nextcloud
  shell: "tr -cd '[:alnum:]' < /dev/urandom | fold -w '32' | head -n 1 > /usr/local/data/docker/nextcloud/secrets/MYSQL_PASSWORD"
  args:
    creates: "/usr/local/data/docker/nextcloud/secrets/MYSQL_PASSWORD"            # run only if not exists

- name: Generate MySQL root password for Nextcloud
  shell: "tr -cd '[:alnum:]' < /dev/urandom | fold -w '32' | head -n 1 > /usr/local/data/docker/nextcloud/secrets/MYSQL_ROOT_PASSWORD"
  args:
    creates: "/usr/local/data/docker/nextcloud/secrets/MYSQL_ROOT_PASSWORD"       # run only if not exists
Add the new role to the home.yml playbook in the root:
---
- name: home server
  hosts: localhost
  become: true
  vars_files:
    - vars_files/home.yml
  roles:
    - base
    - home
    - oefenweb.ufw
    - geerlingguy.docker
    - geerlingguy.ntp
    - geerlingguy.security
    - geerlingguy.node_exporter
    - nextcloud
Push the changes to GitHub ( details).
gitall
Deploy With Ansible #
On your home server, deploy the just created Nextcloud role.
export PAT=YOUR_PAT_TOKEN
sudo ansible-pull -U https://$PAT:[email protected]/Username/repo-name home.yml
Compose File #
If available, I prefer Docker images from
linuxserver.io, as they are updated regularly with the latest security patches, the documentation is excellent, and they support using
different user IDs than root. The latter is crucial to run the container with the dockerlimited user.
In
Dockge, click Scan Stacks Folder in the user menu top right. The nextcloud stack should appear in the list. Paste the following contents in the compose.yaml section:
services:
  nextcloud:
    image: lscr.io/linuxserver/nextcloud:latest
    container_name: nextcloud
    hostname: nextcloud
    volumes:
      - ./config:/config
      - ./data:/data                              # the folder where files are placed
      - /media/18TB:/media                        # add as many local folders as you like and access/share them via nextcloud. Remember that UID=2000 needs read/write permissions.
    expose:
      - 80                                   # default is 443 with a self-signed certificate. We use 80 and create the certificate through Caddy.
    restart: unless-stopped
    networks:
      - caddy_caddynet
  mariadb:
    image: lscr.io/linuxserver/mariadb:latest
    container_name: nextcloud-mariadb
    hostname: nextcloud-mariadb
    volumes:
      - ./db-config:/config
    expose:
      - 3306
    restart: unless-stopped
    networks:
      - caddy_caddynet
  redis:
    container_name: nextcloud-redis
    hostname: nextcloud-redis
    image: redis:latest
    restart: unless-stopped
    networks:
      - caddy_caddynet
    expose:
      - 6379
    volumes:
      - ./redis-data:/data
networks:
  caddy_caddynet:
    external: true
Add the following variables to the env section:
PUID=2000                                           # UID of the dockerlimited user
PGID=2000                                           # GID of the dockerlimited group
TZ=Europe/Berlin                                    # Your timezone
MYSQL_DATABASE=nextcloud
MYSQL_USER=nextcloud
FILE__MYSQL_PASSWORD=/secrets/MYSQL_PASSWORD
FILE__MYSQL_ROOT_PASSWORD=/secrets/MYSQL_ROOT_PASSWORD
Deploy the stack through the Dockge UI. Check the terminal window for any errors and verify that the container is running with your UID.
nextcloud          | ───────────────────────────────────────
nextcloud          |
nextcloud          |       ██╗     ███████╗██╗ ██████╗
nextcloud          |       ██║     ██╔════╝██║██╔═══██╗
nextcloud          |       ██║     ███████╗██║██║   ██║
nextcloud          |       ██║     ╚════██║██║██║   ██║
nextcloud          |       ███████╗███████║██║╚██████╔╝
nextcloud          |       ╚══════╝╚══════╝╚═╝ ╚═════╝
nextcloud          |
nextcloud          |    Brought to you by linuxserver.io
nextcloud          | ───────────────────────────────────────
nextcloud          |
nextcloud          | To support LSIO projects visit:
nextcloud          | https://www.linuxserver.io/donate/
nextcloud          |
nextcloud          | ───────────────────────────────────────
nextcloud          | GID/UID
nextcloud          | ───────────────────────────────────────
nextcloud          |
nextcloud          | User UID:    2000
nextcloud          | User GID:    2000
nextcloud          | ───────────────────────────────────────
Let’s Encrypt Certificate via Caddy #
Caddyfile #
Add the following to Caddyfile ( details):
nextcloud.{$MY_DOMAIN} {
        reverse_proxy nextcloud:80
        tls {
                dns netcup {
                        customer_number {env.NETCUP_CUSTOMER_NUMBER}
                        api_key {env.NETCUP_API_KEY}
                        api_password {env.NETCUP_API_PASSWORD}
                }
                propagation_timeout 900s
                propagation_delay 600s
                resolvers 1.1.1.1
        }
}
DNS A Record #
Add the following A record to your DNS domain:
nextcloud.home.yourdomain.com 192.168.178.254 # replace with your Docker host's IP address
Reload Caddy’s Configuration #
Instruct Caddy to reload its configuration by running:
docker exec -w /etc/caddy caddy caddy reload
Nextcloud Setup #
Browse to nextcloud.home.yourdomain.com and fill out the necessary fields in the setup screen. Take the database password from the /secrets/MYSQL_PASSWORD file.
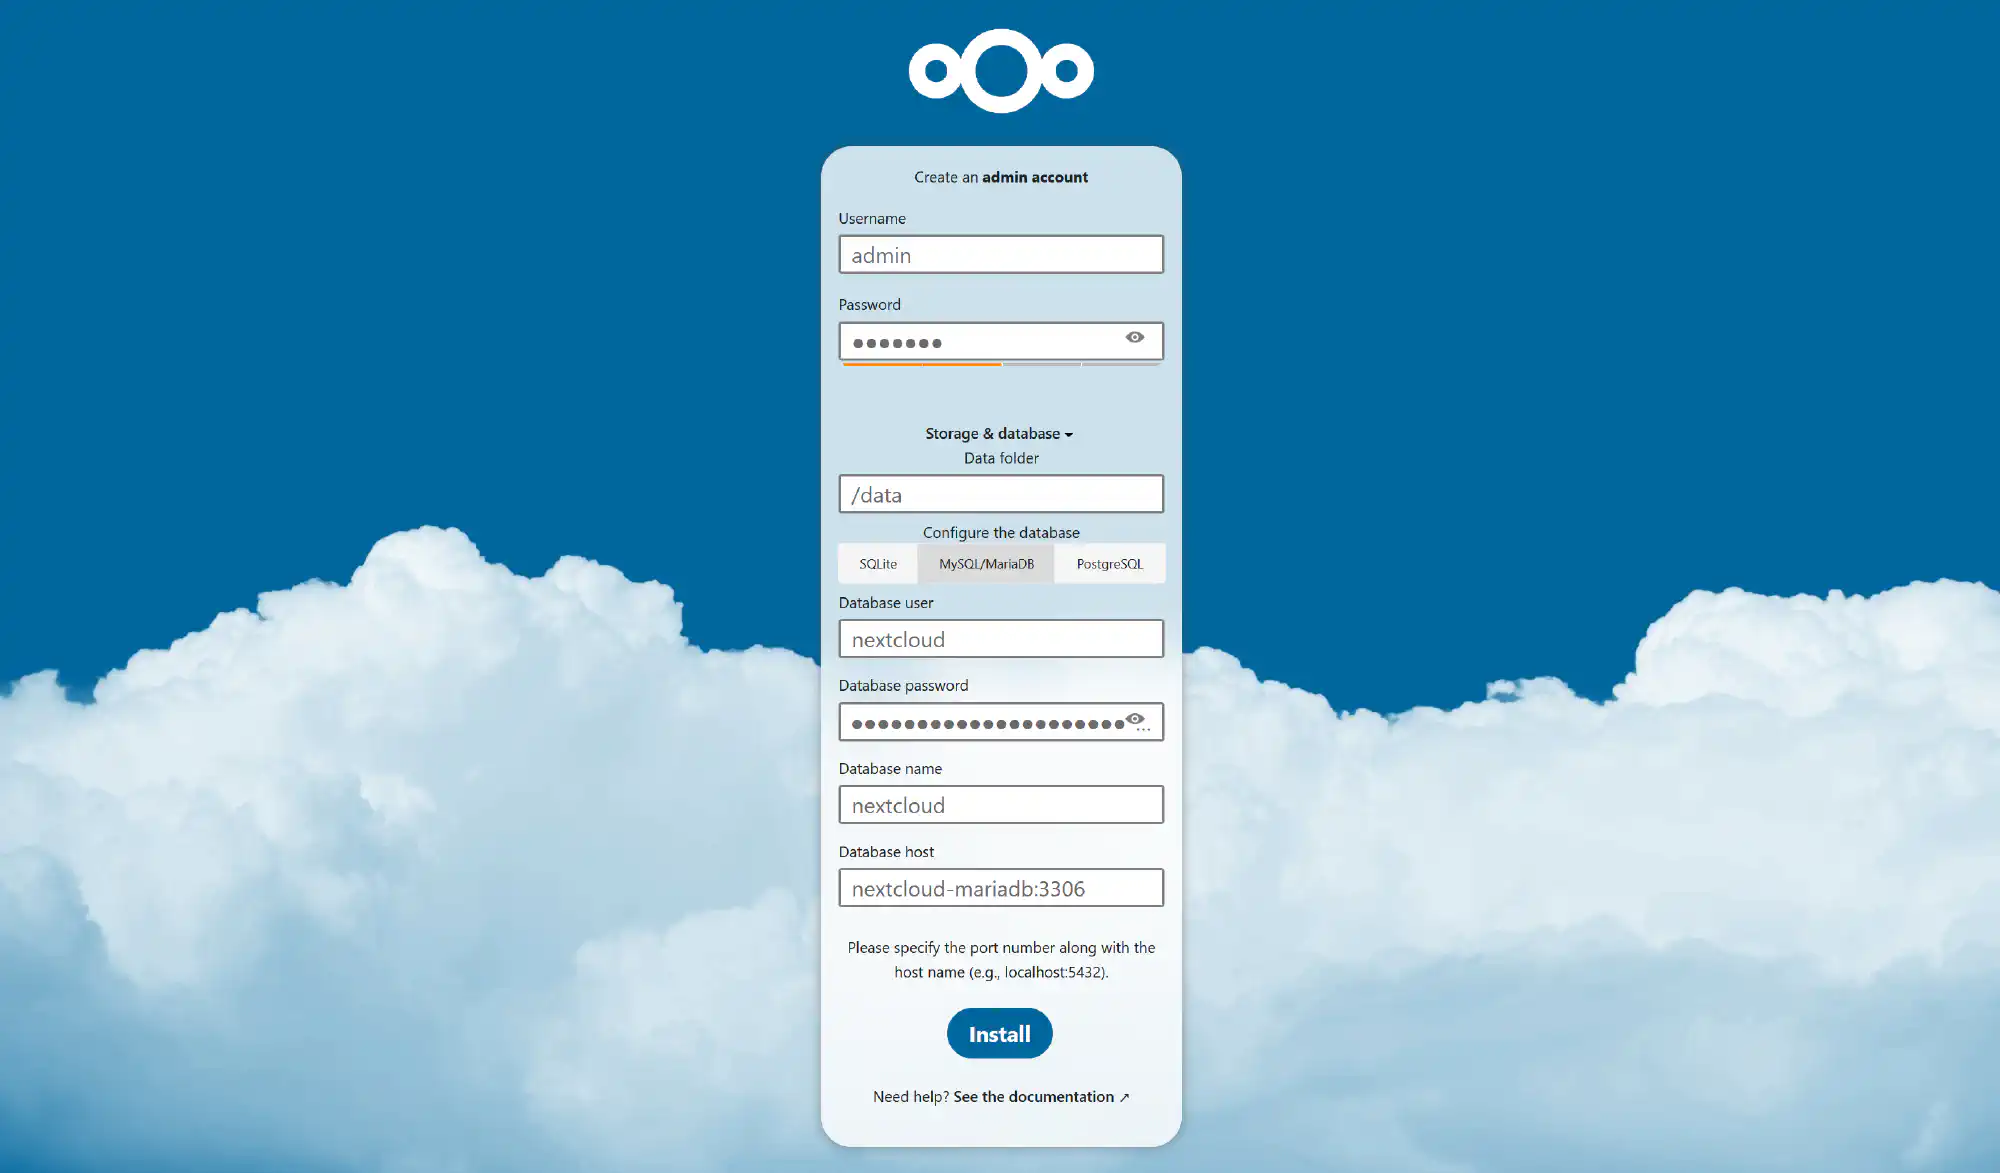
If you can’t log in with your admin credentials after the setup, try logging in with a private browser window.
Choose Skip when Nextclouds asks you to install recommended apps.
On the top right, click the user icon and choose Apps in the menu. Disable all apps except the ones on the list below.
Comments
Deleted files
File sharing
Log Reader
Notifications
Password policy
PDF viewer
Privacy
Text
Versions
In the list of apps find and install the apps External storage support, Group folders, and OpenID Connect Login.
Shut down the stack.
Best Practice Settings #
Open Nextcloud’s configuration file.
vim /usr/local/data/docker/nextcloud/config/www/nextcloud/config/config.php
Add the following settings to the $CONFIG = array ( block.
// disable upgrade notifications in nextcloud web
'upgrade.disable-web' => true,

// disable "welcome" files for new users
'skeletondirectory' => '',
'templatedirectory' => '',

// route users directly to the files view
'defaultapp' => 'files',

// language
'default_language' => 'de',

// delete all files in the trash bin that are older than 3 days automatically, delete other files anytime if space needed
'trashbin_retention_obligation' => 'auto, 3',
E-Mail Settings #
I’ve configured Gmail as my SMTP server. Follow these instructions to activate Gmail SMTP.
// config.php

// mail
'mail_smtpmode' => 'smtp',
'mail_sendmailmode' => 'smtp',
'mail_smtpauth' => 1,
'mail_smtphost' => 'smtp.gmail.com',
'mail_smtpport' => '587',
'mail_from_address' => 'your email without the @gmail.com',
'mail_domain' => 'gmail.com',
'mail_smtpname' => 'your full gmail address',
'mail_smtppassword' => 'your smtp password',
SSO to Nextcloud via OpenID Connect (OIDC) Authentication to Authelia #
This section describes how to set up single sign-on to Nextcloud via OpenID Connect authentication to Authelia. It is based on the Authelia Nextcloud integration guide.
Client Secret #
Generate a random alphanumeric string to be used as client secret:
tr -cd '[:alnum:]' < /dev/urandom | fold -w "64" | head -n 1
Authelia Configuration File #
Add the following to the oidc: section of Authelia’s configuration file config/configuration.yml:
clients:
  - id: nextcloud
    description: Nextcloud
    secret: 'your secret'
    public: false
    redirect_uris:
      - https://nextcloud.home.yourdomain.com/apps/oidc_login/oidc
    scopes:
      - openid
      - profile
      - email
    userinfo_signing_algorithm: none
Differing from the original guide I removed the groups scope, as it erased all group memberships in Nextcloud after every log off.
Restart Authelia #
We changed the container’s environment, which makes it necessary to recreate the container (stopping and starting is not enough). Navigate to the Authelia stack in Dockge and click Stop & Inactive. Then start the stack.
Inspect Dockge’s terminal window for any errors.
Nextcloud Configuration File #
Open the config file again.
vim /usr/local/data/docker/nextcloud/config/www/nextcloud/config/config.php
Add the following:
// OIDC
'allow_user_to_change_display_name' => false,
'lost_password_link' => 'disabled',
'oidc_login_provider_url' => 'https://authelia.home.yourdomain.com',
'oidc_login_client_id' => 'nextcloud',
'oidc_login_client_secret' => 'your secret',
'oidc_login_auto_redirect' => false,
'oidc_login_end_session_redirect' => false,
'oidc_login_button_text' => 'SSO',
'oidc_login_hide_password_form' => true,
'oidc_login_use_id_token' => true,
'oidc_login_attributes' =>
array (
  'id' => 'preferred_username',
  'name' => 'name',
  'mail' => 'email',
),
'oidc_login_default_group' => 'users',
'oidc_login_use_external_storage' => false,
'oidc_login_scope' => 'openid profile email',
'oidc_login_proxy_ldap' => false,
'oidc_login_disable_registration' => false,
'oidc_login_redir_fallback' => false,
'oidc_login_alt_login_page' => 'assets/login.php',
'oidc_login_tls_verify' => true,
'oidc_create_groups' => false,
'oidc_login_webdav_enabled' => false,
'oidc_login_password_authentication' => false,
'oidc_login_public_key_caching_time' => 86400,
'oidc_login_min_time_between_jwks_requests' => 10,
'oidc_login_well_known_caching_time' => 86400,
'oidc_login_update_avatar' => false,
Start the stack through Dockge.
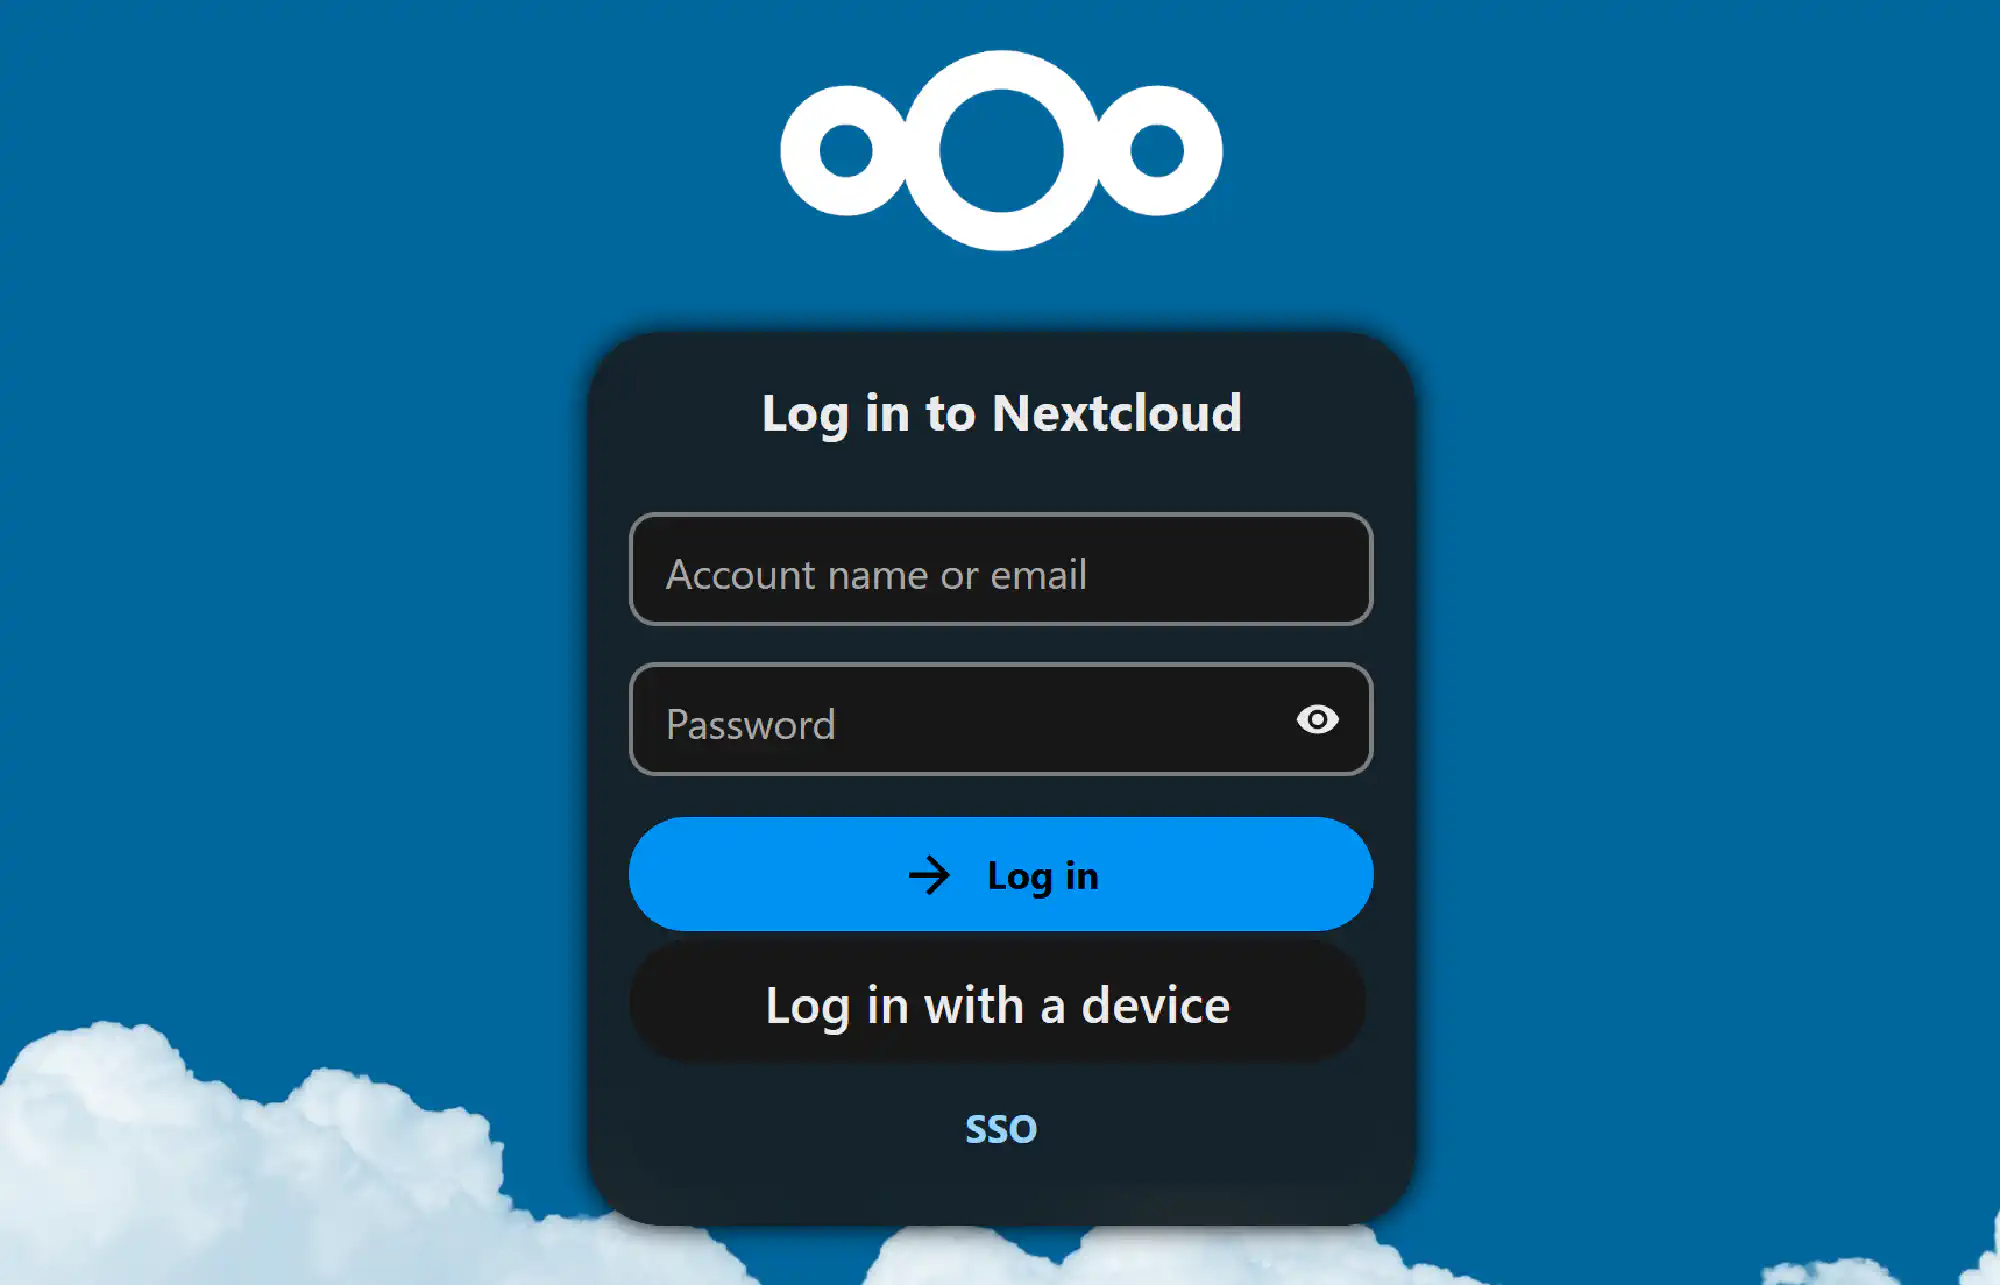
Click on the new SSO button below the login field and log in with your user via Authelia. The account gets auto-provisioned in Nextcloud. Logout directly after that.
Log in with the admin one last time. In the menu top right, click Users and add your user to the admins group.
We can now disable normal user login. Open the config file yet again.
vim /usr/local/data/docker/nextcloud/config/www/nextcloud/config/config.php
Hide the normal login form and only present the SSO button.
'auth.webauthn.enabled' => false,
'hide_login_form' => true,
'simpleSignUpLink.shown' => false,
Restart the stack through Dockge.
At the time of writing this article, Nextcloud presents an ugly warning message. It is a known issue and the team is working on it.

Memory Cache #
To reduce the load on the database, we introduce a Redis memory cache. If you have set up Authelia like me, do not use the existing Redis container for Nextcloud. I had issues signing in with Authelia when it shared its Redis container with Nextcloud.
Open the config file a last time and replace the existing memory cache with the new Redis container.
vim /usr/local/data/docker/nextcloud/config/www/nextcloud/config/config.php
// config.php
'memcache.local' => '\\OC\\Memcache\\Redis',
'filelocking.enabled' => true,
'memcache.locking' => '\\OC\\Memcache\\Redis',
'redis' =>
  array (
    'host' => 'nextcloud-redis',
    'port' => 6379,
  ),
Restart the Nextcloud stack and check Dockge’s terminal window for errors.
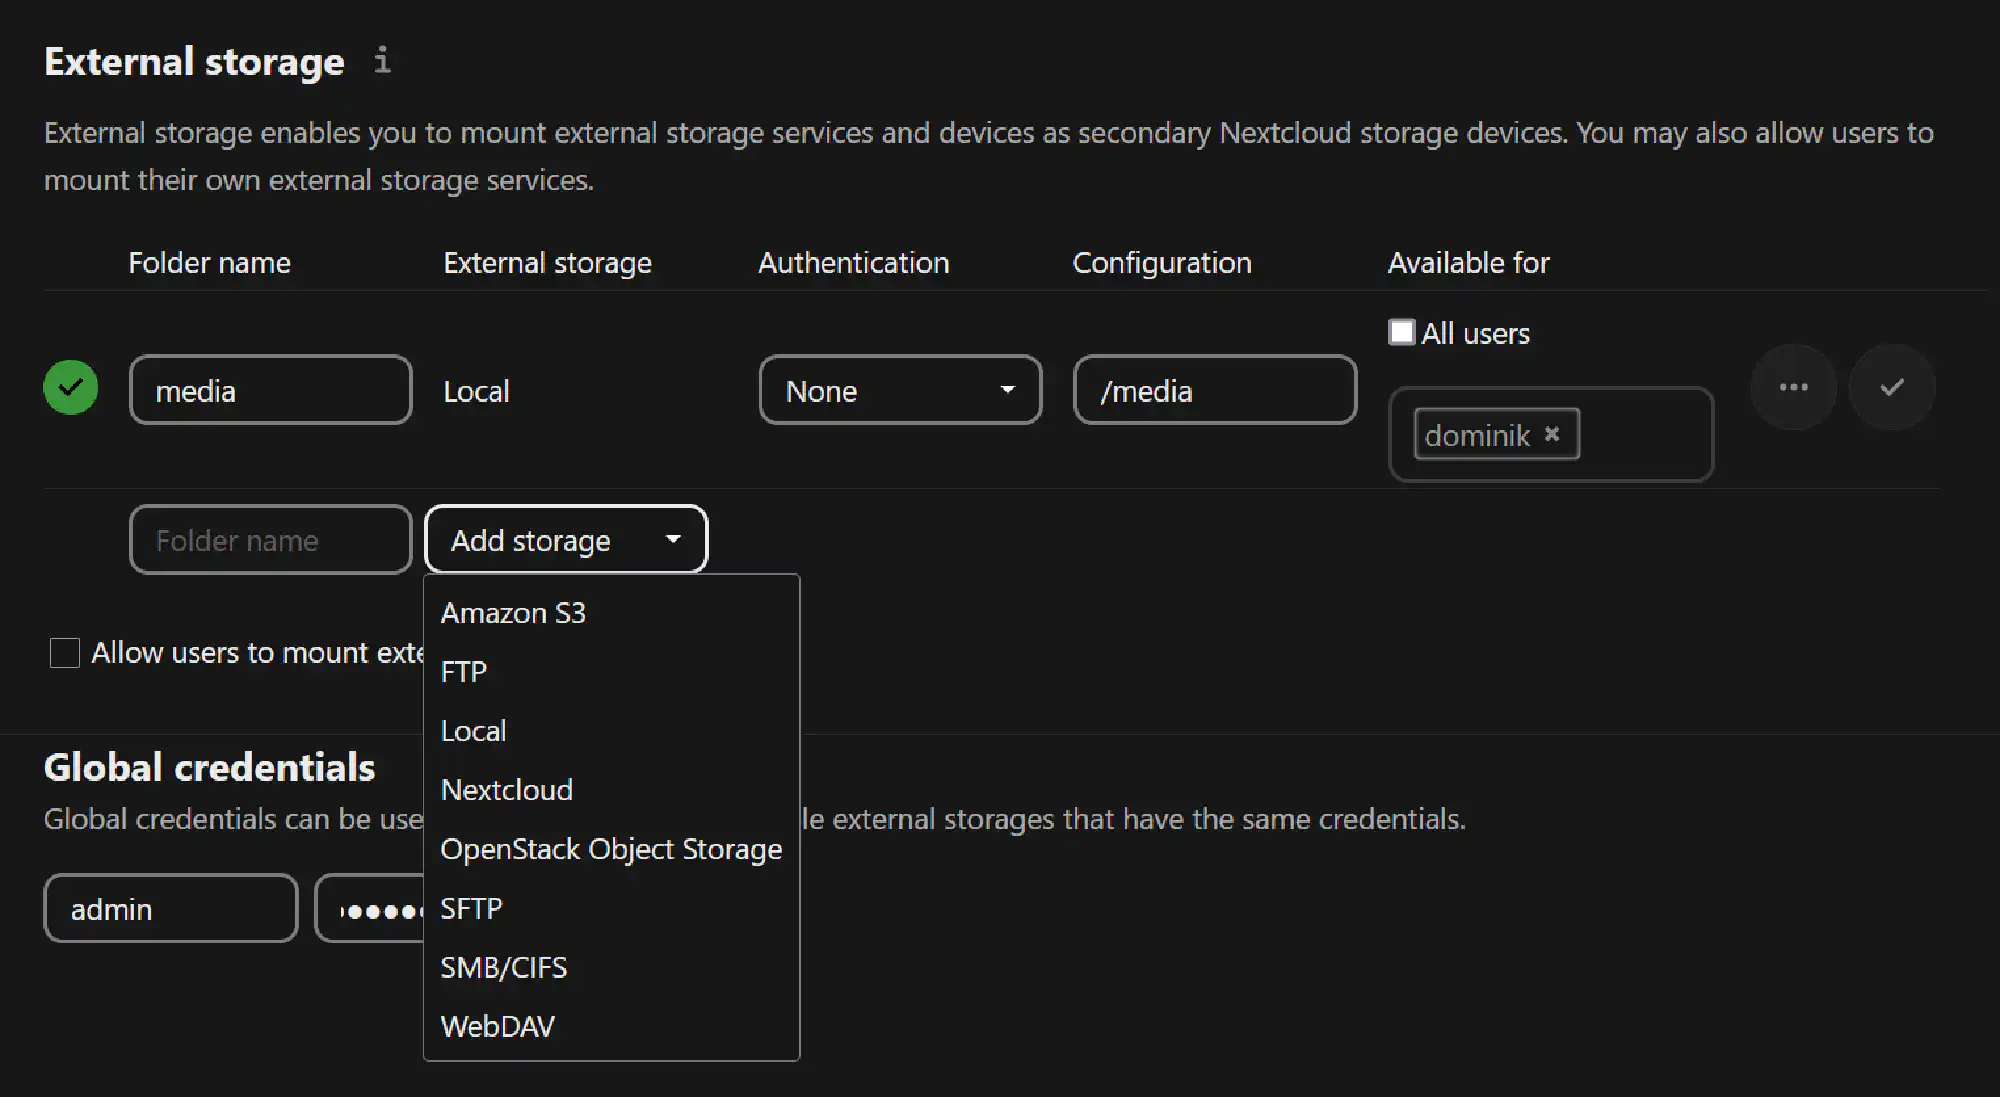
External Storage & Group Folders #
Go to the user menu top right and choose Administration settings.
External Storage #
The External storage app allows you to map FTP, WebDAV, and more options into the Nextcloud interface for easy access.
I’ve used the type local to get access to my external drive in my Nextcloud client apps. I can easily share anything I have through the Nextcloud UI with others.
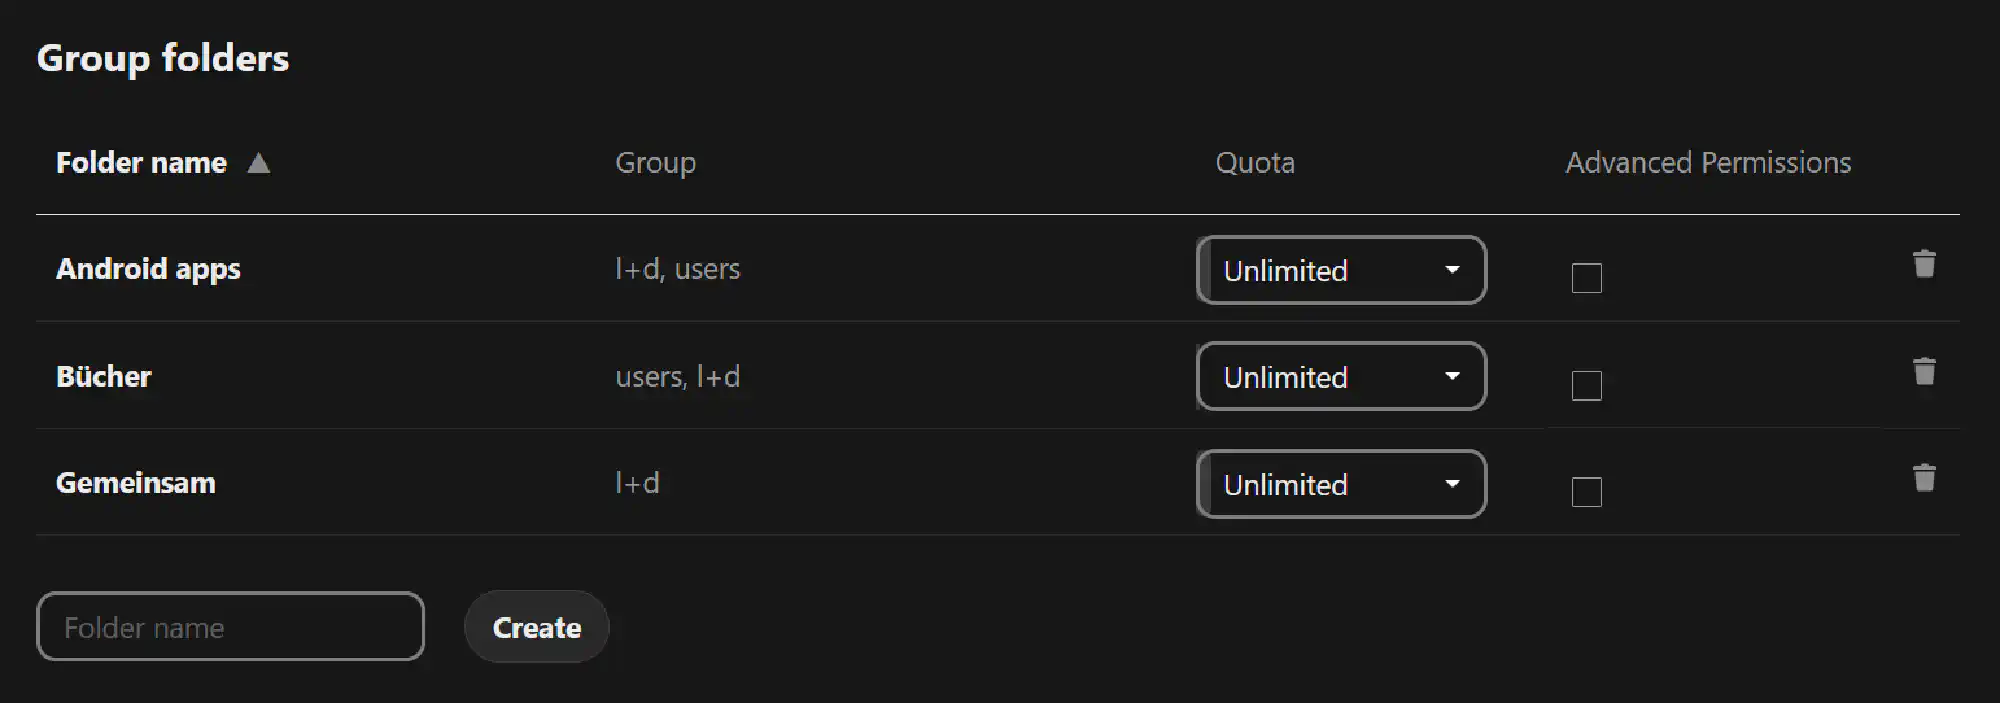
Group Folders #
Group folders are much like Spaces in ownCloud oCIS. They appear at the root for each user and are perfect for families to share common documents and pictures. One can assign granular permissions per folder.
Changelog #
- 2024-02-08: added the
createsparameter to the Nextcloud playbook in the files and folders section.