A guide to setting up an old laptop as your new home server, powered by Ubuntu, Ansible, and Docker. It securely hosts videos, files, and photos. Add HTTPS everywhere, cloud backup and performance monitoring.
Bye Bye Synology, Hello Ubuntu #
TL;DR #
Synology has a great ecosystem, but one is locked in. I’m using Ubuntu LTS server now, as it gives full control and is focused on stability. I chose it over Proxmox for simplicity, as I don’t need virtual machines.
Full Story #
I had a home server for years. I started with a Synology DS210+ thirteen years ago and upgraded to a DS720+ three years ago. The latter allowed running Docker containers and extend the feature set of Synology packages easily. With time, I noticed that I was using only a few Synology packages, namely photos and drive, but the rest was already running in Docker.
In addition, I have these problems with Synology:
- It is built to hold 3,5” spinning disks. These are fine for storage, but not for performance. You can add SSDs as a read cache, but the community is divided about the benefits.
- The CPUs are crap. The DS720+ comes with an Intel Celeron J4125…
- Synology OS can’t map external drives in a storage pool. When you add a drive with files to a storage pool, everything is lost as the drive needs to be formatted. Frustrating…
- In addition to the point above: I had two volumes and a degraded RAID configuration that I could only solve with manual hacking through ssh, which is frustrating (again!) as Synology OS is a very lightweight Linux built. There is no package manager, for example.
It’s a viable solution, but not for tech enthusiasts like me who like to have full control over their devices.
I examined alternatives and ended up with Ubuntu. I’m used to it, and the LTS server variant has a strong focus on stability. It’s also free. Second place was Proxmox. I don’t need virtual machines, though, where Proxmox excels in. I also wanted to use Ansible to automatically install and configure everything, and having Proxmox in between just adds complexity.
Home Server Goals #
These were my goals for the laptop home server:
- Automated deployment: do as little as possible manually. In case of a hardware failure, I can immediately switch to new hardware and have the exact same configuration.
- Docker: put as much as possible into Docker containers for easy management and backup
- Single Sign-On: sign-on with one user identity instead of creating the same user again and again for each service
- HTTPS Everywhere: work with nice names instead of IPs and ports, even when I’m accessing services internally. Adds security, too.
- Backup: robust backup for Docker containers and beyond
- Remote access: secure and easy remote access to selected services
Home Server Hardware #
When you think about it, laptops are the perfect home servers. The hardware is power efficient, they have an integrated uninterruptible power supply with their batteries and an integrated KVM with mouse, keyboard, and monitor. You can get a modern one on the internet for ~€200-€300. Or even for free if you ask around if someone has a spare one lying around. Just make sure that it is not too old (> Intel 7th generation), as older CPUs don’t have great power saving techniques.
I went with a laptop with
- an 8th generation Core i7
- a 1 TB NVMe SSD
- 16 GB memory
More than enough to host a few docker containers and handle 2-4 Plex streams.
I added an external 3,5" drive to store my media collection.
Before You Continue: helgeklein.com #
My colleague Helge built a similar setup with an Intel NUC and Proxmox. He has a complete series on building a home lab with SSO and HTTPS certificates for internal services.
It matches to some of my goals, so I took his series as a framework and added my ideas:
- Obviously other hardware and operating system
- Automatic installation and configuration with Ansible pull
- Remote access without a full VPN tunnel. (Future article)
As my set-up is built on top of his, I encourage you to read his whole series, especially the concept of using Caddy for services in the internal network. I link to his articles whenever there are numerous similarities and only note my customizations.
Introducing Ansible #
Ansible is a free and open-source software to automate software provisioning, configuration management, and application deployments.
I use it to install packages and configure the home server. No steps are done manually, so when the server breaks, I can spin up another, run the deployment there and have the same configuration.
With Ansible, one describes how a target system should look like in YAML. A YAML file is called a playbook. In organizations, there is typically a control server that connects to targets and applies the steps defined in the playbook. That works well but is too complicated for a home lab. You can save the control server and run the playbook directly from GitHub through Ansible pull.
Below is a diagram of the deployment architecture. I prepare the config of the home server on a client, push the config to GitHub, and execute it via Ansible pull on the home server.
Create a Repository On GitHub #
Create a git repository on GitHub.com. I use a private one, as I would rather not share the exact config of my servers with the public.
Install the Windows Subsystem For Linux #
I’m a Windows guy, but I feel that working with git and ssh keys is easier on Linux. Instead of creating a Linux VM dedicated to that purpose, I’m using the Windows Subsystem for Linux (WSL) which is integrated on Windows.
wsl.exe --install -d Ubuntu
Git #
Install Git #
From here on, we work completely in WSL.
apt install git
Configure Git #
Add your email and full name for git commits.
git config --global user.email "[email protected]"
git config --global user.name "Dominik Britz"
Generate a New SSH Key for GitHub #
ssh-keygen -t ed25519 -C "GitHub auth"
I named mine id_ed25519_github. You do want to use a passphrase.
This generates two files:
id_ed25519_github⇽ the private keyid_ed25519_github.pub⇽ the public key
To use the key when connecting to GitHub via ssh later, you need to add the private key to the ssh agent. Create the alias ssha to do this conveniently.
alias ssha='eval $(ssh-agent) && ssh-add ~/.ssh/id_ed25519_github'
You probably need to commit and push a lot while testing, hence add the following alias as well.
alias gitall='git add * && git commit --message "commit" && git push'
Make the aliases permanent by adding the commands to .bashrc. Otherwise, they are gone after you disconnect the session.
vim ~/.bashrc
Add Key To GitHub #
cat ~/.ssh/id_ed25519_github.pub
Go to your
GitHub key settings and enter the output of the cat command as a new authentication key.
Clone the Repository #
Change with your URL.
cd ~
git clone [email protected]:DominikBritz/ansible-configs.git
Set Up Ansible #
Install Ansible #
We need Ansible in the WSL environment to install public roles later. We do not manage the WSL environment with Ansible.
apt install ansible
Create Ansible Folders And Files #
Create the Ansible folder structure.
cd ~/ansible-configs
mkdir roles
mkdir vars_files
Roles #
An Ansible role contains all tasks, variables, and files that logically belong together. They also allow easy sharing with others. I use a combination of my roles and public ones.
Base #
Updates the system and installs a cron job that updates the systems every Sunday at 02:00 and then reboots.
mkdir roles/base/tasks -p
vim roles/base/tasks/main.yml
# Before we do anything on the machine, make sure it is up-to-date
- name: Run the equivalent of "apt update" as a separate step
  ansible.builtin.apt:
    update_cache: yes

- name: Upgrade the OS (apt dist-upgrade)
  ansible.builtin.apt:
    upgrade: dist

- name: Check for pending reboots
  ansible.builtin.stat:
    path: /var/run/reboot-required
  register: reboot_required
  ignore_errors: yes

- name: Reboot the server if required
  ansible.builtin.reboot:
  when: reboot_required.stat.exists

# Periodically update the OS through a cron job
- name: Create cron job for updates and reboot
  ansible.builtin.cron:
    name: Perform weekly updates and reboot
    minute: 0
    hour: 2
    weekday: 0  # 0 represents Sunday in cron
    job: "apt update && apt dist-upgrade -y && apt autoremove -y && reboot"
    user: root
Home #
This role contains the configuration specific to my home server.
- Installs the Unbound DNS server. See Unbound DNS Server Configuration.
- Installs restic and resticprofile for backups. See restic: Encrypted Offsite Backup for Your Homeserver.
I added comments so you can follow along.
Note the step where it mounts an external drive. I have an external drive connected to my home server, as the integrated 1 TB disk has not enough storage for my media collection. If you don’t have one, you can remove this step.
mkdir roles/home/tasks -p
vim roles/home/tasks/main.yml
- name: Disable sleep when closing the lid
  lineinfile:
    path: /etc/systemd/logind.conf
    regexp: '^#?HandleLidSwitch='
    line: 'HandleLidSwitch=ignore'
    backup: yes

###
### Unbound
###
- name: systemd is listening on port 53. Remove that as we need the port for our Unbound DNS server later
  ansible.builtin.lineinfile:
    path: /etc/systemd/resolved.conf
    regexp: '^#?DNSStubListener='
    line: 'DNSStubListener=0'

- name: Restart systemd-resolved service
  ansible.builtin.service:
    name: systemd-resolved
    state: restarted

- name: Update repositories cache and install "unbound" package
  ansible.builtin.apt:
    name: unbound
    update_cache: yes

###
### Backup with restic and resticprofile
###
- name: Install "restic" package
  ansible.builtin.apt:
    name: restic
    update_cache: no

- name: Run restic self-update
  command: restic self-update

- name: Check if directory "/usr/local/bin/resticprofile" exists and store the result in the variable "resticprofile_dir"
  ansible.builtin.stat:
    path: /usr/local/bin/resticprofile
  register: resticprofile_dir

- name: Download resticprofile install.sh script
  get_url:
    url: https://raw.githubusercontent.com/creativeprojects/resticprofile/master/install.sh
    dest: /tmp/install.sh
  when: not resticprofile_dir.stat.exists # this ensures we only do this step in case resticprofile is not already installed

- name: Change permissions of install.sh
  file:
    path: /tmp/install.sh
    mode: 'u+x'
  when: not resticprofile_dir.stat.exists # this ensures we only do this step in case resticprofile is not already installed

- name: Run install.sh script
  shell: /tmp/install.sh -b /usr/local/bin
  args:
    chdir: /tmp
  when: not resticprofile_dir.stat.exists # this ensures we only do this step in case resticprofile is not already installed

- name: Run resticprofile self-update
  shell: resticprofile self-update

###
### Mount external drive
###
- name: Check if the external drive is already mounted
  shell:
    cmd: mount | grep '/media/18TB'
  register: mount_check
  ignore_errors: yes

- name: Mount the drive if not already mounted and set it to mount at boot
  mount:
    path: '/media/18TB'
    src: 'UUID=1c333c73-475d-4b3d-a82d-511321753eab'
    fstype: auto
    state: mounted
    boot: true
  when: mount_check.rc != 0

- name: Set permissions for dockerlimited group on /media/18TB
  acl:
    path: /media/18TB
    entity: dockerlimited
    etype: group
    permissions: 'rwx'
    state: present
    recursive: yes
    default: true
Ansible Galaxy Roles #
Instead of implementing more complex roles myself, I utilize well-known community roles from Ansible Galaxy. Think of it as Ansible’s app store.
Add requirements.yml.
---
roles:
  - name: geerlingguy.docker
  - name: geerlingguy.security
  - name: geerlingguy.ntp
  - name: oefenweb.ufw
  - name: geerlingguy.node_exporter
Download the roles.
ansible-galaxy install --role-file requirements.yml --roles-path roles
geerlingguy.docker
Installs Docker on Linux. Documentation.
geerlingguy.security
Performs some basic security configuration.
- Install software to monitor bad SSH access (fail2ban)
- Configure SSH to be more secure (disabling root login, requiring key-based authentication, and allowing a custom SSH port to be set)
- Set up automatic updates (if configured to do so)
- Documentation
geerlingguy.ntp
Manages NTP.
oefenweb.ufw
Set up the ufw firewall on Ubuntu conveniently through variables. Documentation.
geerlingguy.node_exporter
Installs node exporter for monitoring your home server. Documentation
Variables #
Create a home.yml in vars_files for the home server and then accordingly for each server you want to manage. The files get referenced in playbooks later.
# ntp
ntp_timezone: Europe/Berlin

# firewall
my_ssh_port: 22

ufw_rules:
  # allow ssh traffic
  - rule: allow
    to_port: "{{ my_ssh_port }}"
    protocol: tcp

  # allow dns traffic for unbound
  - rule: allow
    to_port: "53"
    protocol: tcp

  - rule: allow
    to_port: "53"
    protocol: udp

  # allow https traffic to docker containers
  - rule: allow
    to_port: "443"
    protocol: tcp

# security
security_ssh_port: "{{ my_ssh_port }}"
security_autoupdate_reboot: true                              # enable automatic updates
security_autoupdate_reboot_time: "01:00"                      # if a reboot is necessary do it at this time
security_autoupdate_mail_to: "[email protected]"        # send a notification email to your email address

# node exporter
node_exporter_version: '1.7.0'
Root Playbooks #
Create a home.yml in the repository root for your home server, and then accordingly for each server you would like to manage. The name does matter here, as Ansible pull expects it to be identical to the server’s hostname. If it does not find a file matching servername.domain.com.yml or servername.yml it falls back to local.yml.
---
- name: home server
  hosts: localhost
  become: true
  vars_files:
    - vars_files/home.yml
  roles:
    - base
    - home
    - oefenweb.ufw
    - geerlingguy.docker
    - geerlingguy.ntp
    - geerlingguy.security
    - geerlingguy.node_exporter
Push to GitHub #
At this time, the contents of your local git folder should look like the below:
├── LICENSE
├── README.md
├── home.yml
├── requirements.yml
├── roles/
│   ├── base/
│   │   └── tasks/
│   │       └── main.yml
│   ├── geerlingguy.docker/
│   │   ├── ...
│   ├── geerlingguy.node_exporter/
│   │   ├── ...
│   ├── geerlingguy.ntp/
│   │   ├── ...
│   ├── geerlingguy.security/
│   │   ├── ...
│   ├── home/
│   │   └── tasks/
│   │       └── main.yml
│   └── oefenweb.ufw/
│       ├── ...
└── vars_files/
    ├── home.yml
Push the current state to GitHub.
gitall
We’re done now with the client.
Install And Configure the Server #
Operating System #
I won’t cover the installation of Ubuntu, as there are hundreds of guides on the Internet. Just some aspects:
- You want to go with the Ubuntu LTS server edition without a graphical interface for maximum performance and stability.
- Set the hostname to
home.
Generate a New SSH Key For Remote Management #
ssh-keygen -t ed25519 -C "remote management"
Store the private key in your WSL environment on your client. You can now close the lid of your laptop home server and hopefully never touch it again.
Run With Ansible Pull #
To use Ansible pull with a private GitHub repository, create a personal access token. I use a fine-grained token that has access to one repository only.

Run ansible-pull to configure your server. If the playbook requires a reboot after the update step, reboot the server and run the playbook again. Ansible can’t reboot automatically, as it would effectively kill itself.
Change the PAT token and the GitHub URL.
sudo apt update
sudo apt install ansible
export PAT=YOUR_PAT_TOKEN
sudo ansible-pull -U https://$PAT:[email protected]/DominikBritz/ansible-configs home.yml
Create Docker Containers #
Creating the Docker containers is a one-time manual step. Everything will be backed up later with restic and can be restored in case of data loss. Hence, I did not use Ansible to automate this task.
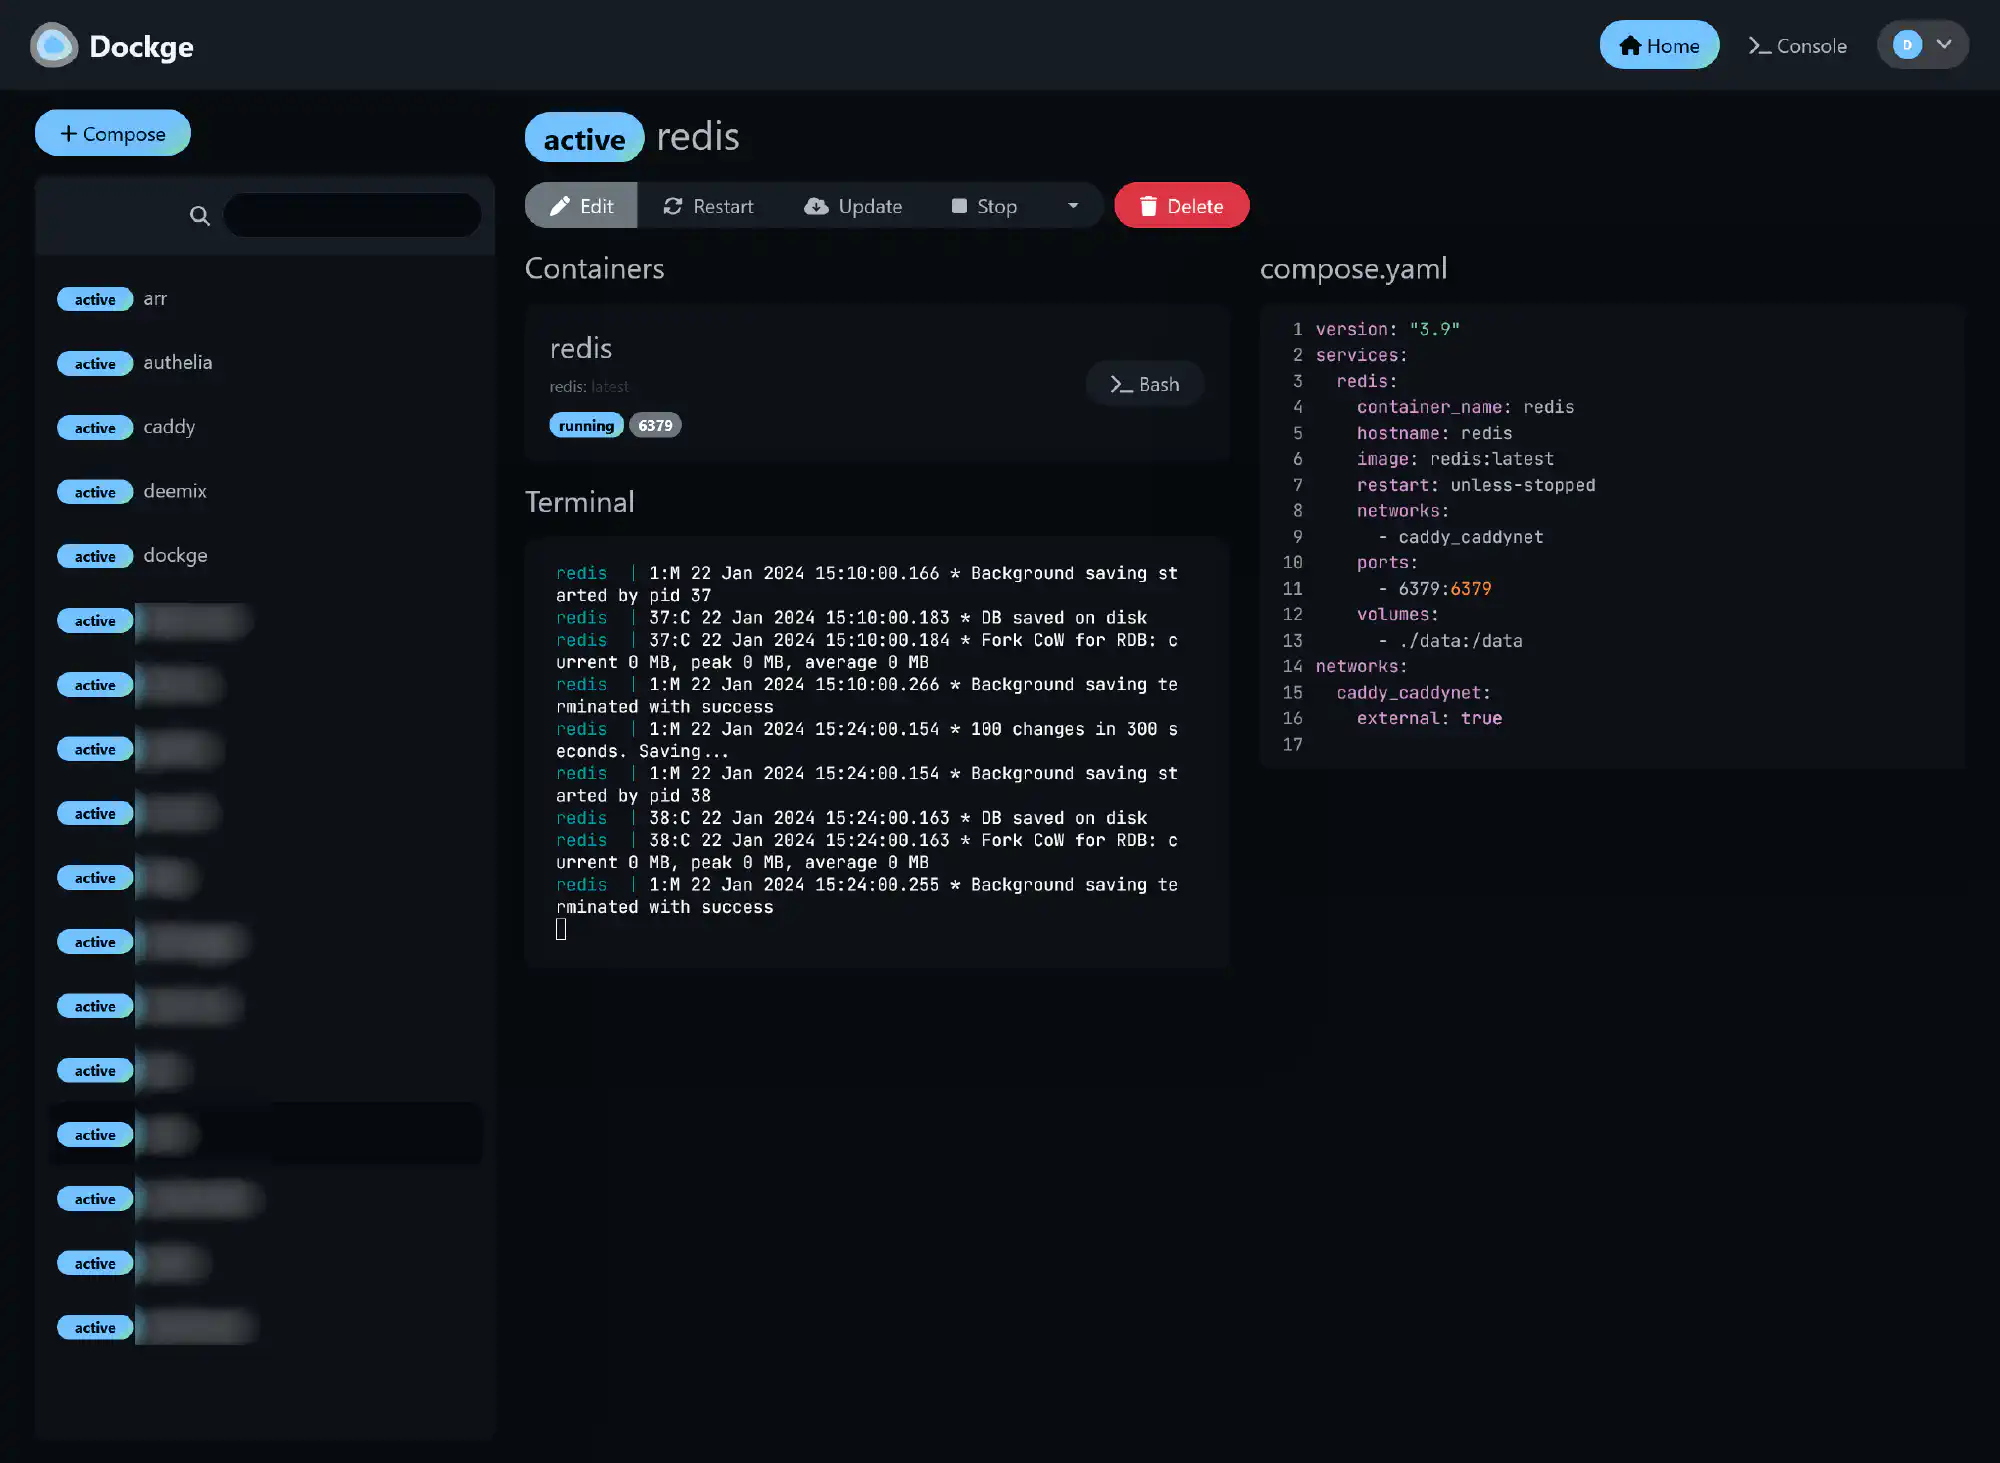
The first container is my management container Dockge. It’s fast, has a pretty UI, and, in comparison to Portainer, it has a file-based structure — Dockge won’t kidnap your compose files, they are stored on your drive as usual. You can interact with them using normal docker compose commands.
Create the Dockge folder. Putting content that is accessed by multiple users in /usr/local is my preference. Other options are:
/opt/etc- Create your own root like
/data
mkdir -p /usr/local/data/docker/dockge
Create a Dockge compose file with the custom path from above.
cd /usr/local/data/docker/dockge
curl "https://dockge.kuma.pet/compose.yaml?port=5001&stacksPath=/usr/local/data/docker" --output compose.yaml
Start the container with docker compose up -d. Browse to http://IPADDRESS:5001 to see the UI. This is where we create all future containers.
Unbound DNS Server Configuration #
I followed Helge’s guide and set up Unbound as a DNS resolver. I skipped the static IP part, as Ubuntu supports DHCP. Instead, I added a reservation for my home server on my DHCP server.
I will discuss secure external access in a future blog article. Having an internal DNS resolver becomes essential then, so don’t skip this step.
restic: Encrypted Offsite Backup for Your Homeserver #
I followed Helge’s guide for restic and resticprofile for backups. You can skip the installation part, though, as Ansible handles this for you.
In addition to Helge’s setup, I added an exclude file to add excludes anytime without having to reschedule.
In the data/resticprofile/profiles.yml add the iexclude-file setting to the backup section.
# Backup command
  backup:
    iexclude-file: "excludes"          # name of your exclude file
Create the excludes file. Whenever you want to exclude files from your backup, add a line with the path to the file.
excludes:
# Syntax: https://pkg.go.dev/path/filepath#Match
# all strings are case-insensitive

# exclude all files in the deemix/downloads folder
*/docker/deemix/downloads/*
Automatic HTTPS Certificates for Services on Internal Home Network #
I followed Helge’s guide and use Caddy for certificates for my internal services. He uses Cloudflare, but I use Netcup. To get it working with Netcup, do the below.
Edit the Dockerfile in /caddy/dockerfile-dns.
ARG VERSION=2

FROM caddy:${VERSION}-builder AS builder

RUN xcaddy build \
    --with github.com/caddy-dns/netcup

FROM caddy:${VERSION}

COPY --from=builder /usr/bin/caddy /usr/bin/caddy
In your container-vars.env, remove the CLOUDFLARE_API_TOKEN and add Netcup specific variables.
NETCUP_CUSTOMER_NUMBER=12345678                     # get the ID from your CCP page
NETCUP_API_KEY=ABCD                                 # https://helpcenter.netcup.com/en/wiki/general/our-api
NETCUP_API_PASSWORD=password                        # https://helpcenter.netcup.com/en/wiki/general/our-api
The Caddyfile references these variables. Furthermore, Netcup requires some additional settings in the tls configuration.
dockge.{$MY_DOMAIN} {
        reverse_proxy {$MY_HOST_IP}:5001
        tls {
                dns netcup {
                        customer_number {env.NETCUP_CUSTOMER_NUMBER}
                        api_key {env.NETCUP_API_KEY}
                        api_password {env.NETCUP_API_PASSWORD}
                }
                propagation_timeout 900s
                propagation_delay 600s
                resolvers 1.1.1.1
        }
}
As you can guess from the timeout setting of 900 seconds, it can take a while until the certificate is successfully obtained by caddy. You can monitor the status in the Dockge terminal chart of the caddy container.
SSO & Monitoring #
I followed Helge’s other articles more or less exactly.
- Authelia & lldap: Authentication, SSO, User Management & Password Reset for Home Networks
- Grafana Setup Guide With Automatic HTTPS & OAuth SSO via Authelia
- Docker Monitoring With Prometheus, Automatic HTTPS & SSO Authentication
Conclusion And Next Articles #
I achieved all my goals that I’ve set initially. Let’s go over them:
- Automated deployment: all packages are installed and configured via Ansible. The only manual step is the Ubuntu installation.
- Docker: all services are running as Docker containers. Essential services like DNS and backup are installed natively.
- Single Sign-On: provided by LLDAP and Authelia
- HTTPS Everywhere: served through Caddy
- Backup: restic and resticprofile backup for Docker mount points and important files like the Unbound configuration
- Remote access: will be covered in a future article
I will continue this series with articles on remote access, Nextcloud for files, Immich for photos, Sonarr/Radarr/Plex for media management, and maybe more.
Changelog #
-2024-01-31: added section about changes to the Dockerfile for Caddy